Tuesday, November 20, 2007

Yr 2 - Day 299

Countertop is in!! Just need the final plumbing and she's good to go. Oh and for some reason the Electrolux Icon induction cooktop won't power up so someone is coming to check on that.


The view to the old kitchen the day we viewed the house. (where the old stove is is where the new oven is.)


The Old kitchen now.


New kitchen - wheeeeeee! (The pendants and sink are approx. where the old wall used to be)

Yr 2 - Day 299

Countertop is in!! Just need the final plumbing and she's good to go. Oh and for some reason the Electrolux Icon induction cooktop won't power up so someone is coming to check on that.

Monday, November 05, 2007

Build Fireplace Mantel Reprive

This is a do over of an article about how I built my own fireplace mantel. It's now painted gloss white and the brick work is refinished (see entries below).


It's done - Bob will have somewhere to hang his stocking. I bought the lumber for everything but the pilaster molding and top and bottom blocks - that came as a pilaster kit from Lowes (?). I got some good guides to how to do the structure from here

http://www.diynetwork.com/diy/hi_fireplace/article/0,2037,DIY_13914_2269267,00.html

and here

http://www.taunton.com/finewoodworking/pages/bw0011.asp

and here

http://www.doityourself.com/stry/buildfireplacemantel

Faux Brick Finish on Fireplace Reprive

This is a republish of a post from January 25th, 2007 for Houseblogs.net Fireplace tagging thingy:


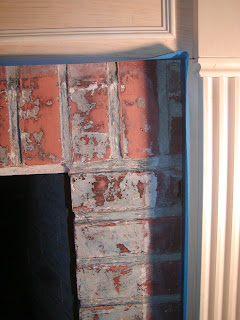
Slowly getting back into some projects after a lull over Xmas. Have mainly been concentrating on the kitchen project but last night I took on the brick surround on the fireplace (yet again). Last effort was four coats of paint stripper and no brick in sight (first two coats were an environmentally-friendly stripper that you left on for 24hrs til it changed color, 2nd two coats were a chemical stripper but still no luck.
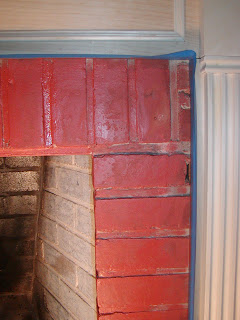
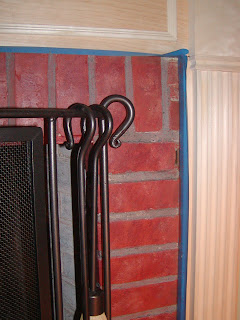
I headed to Lowes and got some heavy duty (50) sand paper for the Mouse and also a bunch of brick red paint swatches. I sanded the brick a bit and results were mixed - some of the paint came off easily but some was on there for good so I decided I have to do the faux paint. Back to Lowes but this time I had matched the swatches to the actual brick tones and bought 3 sample pots of paint ($3.98 each and a "pouncer" brush to stipple - couldn't bring myself to drop $15 on a sponge). The mid color that I painted on first was American Century Tropical Nut, then a stippling of the just slightly darker Cliveden Henna Red and then a stippling over that of a slightly lighter color - Florentine Clay - that I softened and dispersed a lot more with the brush to get that kind of effervescence white sheen that you get on bricks.
I think the results were pretty good - the flash doesn't help the photo. I painted on the medium shade first and then stippled the darker tone on top and then stippled the lighter tone over that being sure to really work it so that it looked like a soft smudge and not edgey. The samples only came in satin but I didn't want to buy a quart of flat so I might have to hit it all with a matt clear top coat. Just need to go back tonight and get a cement color for the mortar and then I can start priming/painting the mantel/wood surround.

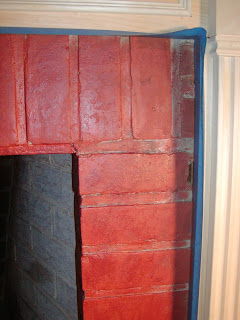
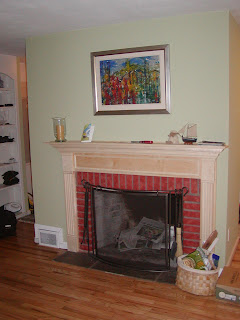
Went back to Lowes tonight with another matching color swatch but wanted to check if there was any ready-made mortar in a tub that I could use as the painting was going to be a pain. Luckily Lowes had Quikrete Textured Mortar Repair ($1.99) - think grey bath caulk with sand and grit in it. So I just smoothed that on with my fingers in to the mortar groove and wiped off the edges of the brick and I think it looks fab. It really needs a wash coat to cut the new and clean look, to give it a bit of grime so I will have to look into that but apart from that it was a much easier, quicker project than I had anticipated.

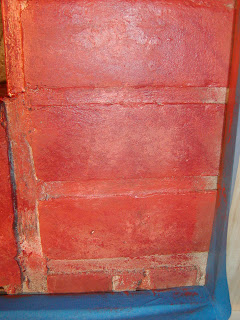
I have since added a faint glaze as I thought everything looked too new and clean cut. I went back to Lowes and picked up a small bottle of their premixed Antique Glaze, it's in the Faux Painting display area. I was originally going to darken some individual bricks to give it the reused chimney brick look but I just faintly added some "dirt" all over - bricks and mortar with an old towel and as with the paint colors worked it really well so that there were no hard edges or obvious splodges. Fireplace mantel has since been painted gloss white.

Saturday, November 03, 2007

Year 2 - Day 282

It's always good to pause and reflect.


Before


After minus fridge, DW, countertop and cooktop

Year 2 - Day 282


3" hole, 6" duct. You do the math.


Ay carumba! The range hood is up but not without much crunching of brain cells, wringing of hands and of course the able help of Bob. Many challenges as usual. 1) our ceiling is only 7'6" so with the hood at the recommended 28" above the cooktop that left us with just over 14" to get the duct up, through a 90 degree turn and out the wall; 2) The center point for the range hood was right on a stud, a stud which happened to be the LH stud of a panned in stud bay that was a return for the HVAC which couldn't be violated; 3) The outer edge of the range hood chimney was about 3-1/2" from the center line and had a 5/8" flange that sat against the wall, this gave us an effective useable space for the outgoing duct of approx. 3"; 4) The duct collar coming out of the range hood was 6" circular and centered on the range hood so that also compromised the fit of the ducting.


This picture shows the final solution: having hummedand ha'd and visited Lowes and HD and searched the web, I visited a plumbing supply place that I passed on hte way to my Drs. I explained my challenge to a nice chap at in N&S Supply, Danbury, CT and out of the many ducts he showed me we found a 90 degree elbow that was 6" round on one end and 6" oval on the other. This was like it was custom made for me! The vertical oval was 3" at it's widest section (see 2nd top picture) - just enough to go through the gap that we had. I had to shorten both the 6" round cone part and the 6" oval part to get it to turn a full 90 degrees in the 14" that we had to work with. I sheet metal screwed it and aluminum taped it to stop it breaking apart when we shoved it through the wall. I also extended the oval end so that it would extend all the way through the wall.


Here it is in all it's friggin' glory. We hung the range hood part first and then Bob suggested I elongate the hole in the wall upwards so that I had play to push the duct through the wall and slide it over the range hood collar. He also suggested I cut the back of the duct into a couple flanges to assist it over the collar. Bob I know you are a genius so here are your props for that. With those tweaks done the two ducts defied all physics and the 2" offset that was between them and slipped together like a charm. The only loss was that we couldn't do the chimney in one piece but you can barely see the telescoping overlap. I also had to trim down the wall flanges on the chimney as they where touching the duct on the LH side and preventing the chimney sections from nesting correctly and making it look shitey instead of fab.


So today I just had to finish off the outside. As usual still not a straight forward job as the siding wasn't level so I filled it in with some siding offcuts (see there's a reason why you shouldn't throw anything away until the whole job is done) turned the opposite way to the boards so that I got a flat surface so that the plastic cover would sit flush with the siding. I also had to customize the plastic duct vent as it was made for 6" round. After filling in the gaps around the duct with insulating foam, I cut the duct extension into flanges so that it I could sheet metal screw it to the siding. I then aluminum taped over all screws and seams to fully seal the duct exit and then screwed the plastic cover to the wall and caulked where it touched the wall. I have burnt more brain cells on this project than I did on moving the window but I think the final result has been worth it.

Year 2 - Day 282


Ay carumba! The range hood is up but not without much crunching of brain cells, wringingof hands and of course the able help of Bob. Many challenges as usual. 1) our ceiling is only 7'6" so with the hood at the recommended 28" above the cooktop that left us with just over 14" to get the duct up, through a 90 degree turn and out the wall; 2) The center point for the range hood was right on a stud, a stud which happened to be the LH stud of a panned in stud bay that was a return for the HVAC which couldn't be violated; 3) The outer edge of the range hood chimney was about 3-1/2" from the center line and had a 5/8" flange that sat against the wall, this gave us an effective usuable space for the outgoing duct of approx. 3"; 4) The duct collar coming out of the range hood was 6" circular and centered on the range hood.
This picture shows the final solution: I explained my challenge to a local plumbing supply store (N&S Supply, Danbury, CT) and out of the many ducts they showed me we found a 90 degree elbow that was 6" round on one end and 6" oval on the other. This was like it was custom made for me! The vertical oval was 3" at it's widest section - just enough to go through the gap that we had. I had to shorten both the 6" round cone part and the 6" oval part to get it to turn a full 90 degrees in the 14" that we had to work with. I sheet metal screwed it and aluminum taped it to stop it breaking apart when we shoved it through the wall. I also extended the oval end so that it would extend all the way through the wall.


Here it is in all it's friggin' glory.


So today I just had to finish off the outside. As usual still not a stright forward job as the siding wasn't level so I filled it in with some siding offcuts turned the opposite way to the boards so that I got a flat surface so that the plastic cover would sit flush with the siding. I also had to customize the plastic duct vent as it was made for 6" round. After filling in teh gaps around the duct with insulating foam, I cut the duct extension into flanges so that it I could sheet metal screw it to the siding. I then aluminum taped over all screws and seams to fully seal the duct exit and then screwed the plastic cover to the wall and caulked the where it touched the wall. I have burnt more brain cells on this project than I did on moving the window but I thinkthe final result has been worth it.